
Mastering TIG Welder Techniques in 7 Steps
TIG welding, or Tungsten Inert Gas welding, is a precise and versatile method favored by professionals and hobbyists alike. Mastering this technique can elevate your metalworking skills, enabling you to create high-quality welds across various materials. This guide will walk you through essential steps to improve your TIG welding techniques, ensuring you achieve consistent and accurate results. common welding challenges.
In this post, we focus on practical tips, common mistakes to avoid, and a checklist to help you along the way. Whether you're a beginner looking to get started or an experienced welder seeking to refine your skills, these insights will enhance your welding capabilities.
Table of Contents
Step 1: Understand the Basics of TIG Welding
Before diving into the techniques, it's crucial to have a solid understanding of how TIG welding works. This method utilizes a non-consumable tungsten electrode to produce the weld. A shielding gas, typically argon, protects the weld area from contamination. Mastering TIG Welder Techniques: Your Comprehensive Guide.
Key Components
- Tungsten Electrode: Select the right size and type based on your material.
- Shielding Gas: Argon is commonly used; ensure you have a proper flow rate.
- Filler Material: Choose a filler rod that complements the base metal for optimal results.
Step 2: Set Up Your Equipment Properly
A well-set welding machine is critical for effective welding approaches. Ensure your TIG welder is correctly configured for the material and thickness you will be working with. Proper setup not only enhances the quality of your welds but also ensures safety during the welding process. Below are detailed steps and considerations to help you achieve optimal equipment configuration.
Equipment Configuration
- Adjust the amperage settings according to the material thickness. As a general rule, set the welder to about 1 amp for every 0.001 inches of material thickness. For example, if you are welding 1/8 inch (0.125 inches), set the welder to approximately 125 amps.
- Check gas flow rates; typically, 15-20 cubic feet per hour is ideal. Adjust the flow rate based on the size of your torch and the type of material. For thinner materials, lower gas flow may be sufficient, while thicker materials may require higher flow to prevent contamination.
- Ensure your torch and ground clamp are correctly connected. A poor ground connection can lead to arc instability and inconsistent welds. Make sure the ground clamp is attached to clean, bare metal and that the torch is securely connected to the gas supply.
Additional Setup Considerations
- Choose the right tungsten electrode for your application. For aluminum, use a pure tungsten or a zirconated tungsten electrode, while for stainless steel and mild steel, a 2% thoriated tungsten is recommended. The diameter of the tungsten should match the amperage; for instance, a 1/16 inch tungsten is suitable for low amperage, while a 1/8 inch tungsten is better for higher amperage.
- Set up your filler rod. The type and diameter of the filler rod should match the base material. For example, use ER70S-6 for mild steel and ER4047 for aluminum. Ensure the filler rod is clean and free from contaminants.
- Configure your shielding gas. Argon is the most common shielding gas for TIG welding, but for aluminum, a mix of argon and helium can provide better penetration. Make sure to use the correct gas mixture for your specific welding application.
Common Mistakes to Avoid
- Neglecting to clean the workpiece thoroughly. Any dirt, grease, or oxide layer can compromise the quality of your weld. Always clean the surfaces to be welded using a suitable solvent or a wire brush.
- Incorrectly setting the torch angle. For most applications, a torch angle of about 15 to 20 degrees from vertical is recommended. This helps maintain a stable arc and allows for better control of the puddle.
- Failing to check the gas cylinder level. An empty gas cylinder can lead to insufficient shielding, resulting in contamination and poor weld quality. Always check your gas levels before starting a project.
Final Checklist Before Welding
- Verify the amperage setting is appropriate for the material thickness.
- Confirm the gas flow rate is within the recommended range.
- Ensure the torch and ground clamp connections are secure.
- Check that the correct tungsten and filler rod are selected.
- Inspect the work area for cleanliness and safety.
- Review the setup one last time to ensure everything is in order before beginning your weld.
By following these detailed steps and avoiding common pitfalls, you will be well on your way to mastering the setup of your TIG welder, which is essential for achieving high-quality welds in your projects.
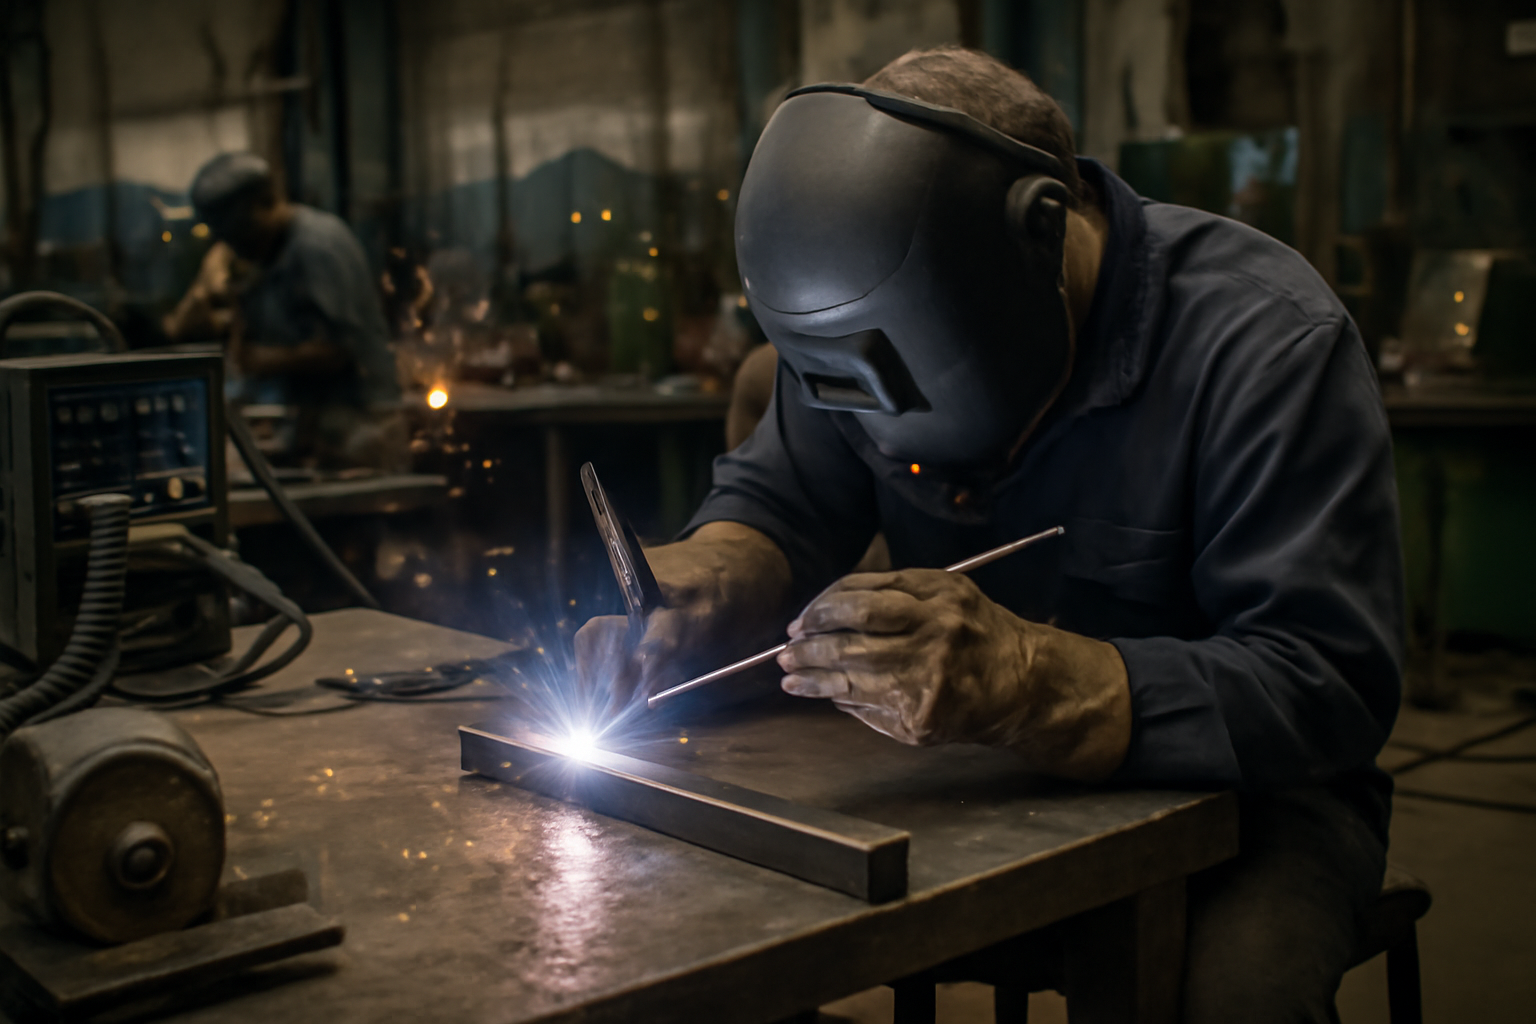
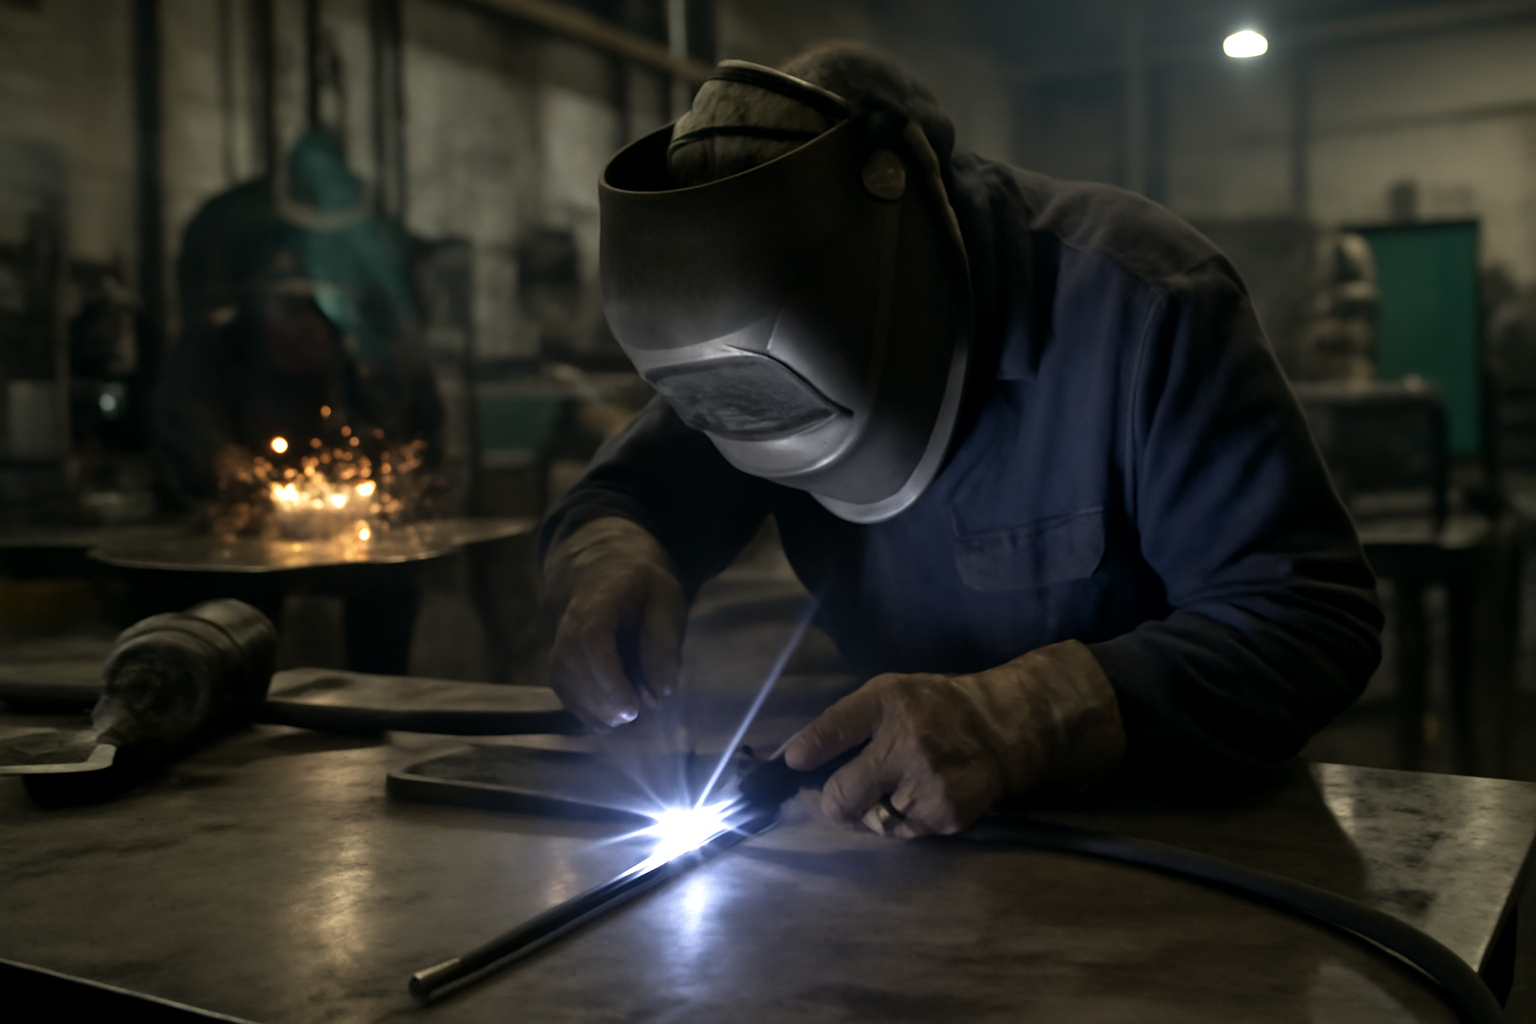
Step 3: Master the Welding Technique
Having the right technique is essential for producing quality welds. The key is to maintain a steady hand and consistent travel speed.
Welding Technique Tips
- Hold the torch at a 15-20 degree angle to the workpiece.
- Maintain a distance of 1/8 inch between the tungsten and the metal.
- Travel at a consistent speed; too fast can lead to weak welds, while too slow can cause burn-through.
Step 4: Practice Different Positions
Welding in different positions can challenge your skills. Practice flat, horizontal, vertical, and overhead welds to develop versatility. Each position presents unique challenges that require specific techniques and adjustments to achieve quality welds. By mastering these positions, you will enhance your overall welding proficiency and be better prepared for a variety of projects.
Positioning Techniques
- Flat Position: Start with easy, flat welds to build confidence. Ensure your workpiece is securely clamped down to prevent movement. Use a steady hand and maintain a consistent travel speed. This position is ideal for practicing bead placement and penetration depth.
- Horizontal Position: In this position, maintain a consistent angle of the torch to ensure even heat distribution. Practice moving the torch in a straight line while keeping the arc length steady. Common mistakes include weaving too much or moving too quickly, which can lead to inadequate penetration or burn-through.
- Vertical Position: Adjust your angle and speed to avoid sagging. A common technique is to push the puddle upward, which helps control the molten metal. Use a slower travel speed and a tighter arc to maintain control. Practice both uphill and downhill techniques, as they require different approaches. Uphill welding involves moving the torch against gravity, while downhill welding allows for faster travel speeds but requires precision to avoid excessive drip.
- Overhead Position: Ensure your grip is secure to prevent fatigue during longer welds. Find a comfortable stance that allows you to maintain a steady hand while welding. Use a shorter arc length to control the puddle and prevent it from sagging. Consider using a larger tungsten electrode for better heat retention. Practice with different materials, as some may require adjustments in technique due to their thickness and melting properties.
Practice Tips
- Set up a dedicated practice area with various materials and positions.
- Start with small sections to avoid fatigue and build up to larger projects.
- Record your sessions to analyze your technique and identify areas for improvement.
- Seek feedback from experienced welders or instructors to refine your skills.
- Regularly challenge yourself with new projects that incorporate different positions.
Common Mistakes to Avoid
- Neglecting to clean the base metal before welding, which can lead to poor adhesion and weld quality.
- Failing to adjust your settings based on the position, which can result in inconsistent welds.
- Overheating the material, especially in vertical and overhead positions, which can cause warping or burn-through.
- Not practicing enough in each position, leading to a lack of confidence and proficiency.
By incorporating these techniques and tips into your practice routine, you will develop the necessary skills to tackle a variety of welding positions with confidence. Regular practice will not only improve your technique but also prepare you for real-world applications in metal fabrication and repair work.
Step 5: Focus on Cleanliness and Preparation
Clean metal surfaces are vital for a successful weld. Contaminants can lead to defects and weaken the weld joint. A clean workpiece not only improves the quality of the weld but also enhances the overall appearance and durability of the finished product. Proper preparation is essential for achieving consistent results in TIG welding.
Preparation Steps
- Remove rust, oil, and dirt using a grinder or wire brush. Ensure you use the appropriate tool for the type of metal you are working with. For instance, stainless steel may require a stainless steel wire brush to avoid contamination.
- Use a chemical cleaner or solvent to ensure the surface is free of impurities. Common solvents include acetone or isopropyl alcohol. Apply the cleaner with a lint-free cloth and let it dry completely before welding.
- Fit-up your joints properly to ensure even gaps and alignment. This involves clamping the pieces together securely and verifying that they are flush and aligned. Use a square or a level to check for proper alignment. Misalignment can lead to inconsistent welds and structural weaknesses.
- Inspect the edges of the metal pieces for any burrs or sharp edges. Use a deburring tool or a file to smooth these edges, which will help in achieving a better weld penetration and reduce the risk of defects.
- Consider the type of filler material you will be using and ensure it is compatible with the base metals. Clean the filler rod with a solvent as well to remove any surface contaminants.
Common Mistakes to Avoid
- Skipping the cleaning process: Many novice welders underestimate the importance of cleanliness. Always prioritize cleaning, as even minor contaminants can lead to significant welding issues.
- Using the wrong cleaning tools: Using abrasive tools that are not suited for the specific metal can introduce additional contaminants. Always choose tools that are appropriate for the material type.
- Neglecting to check fit-up: Failing to properly fit and align joints can lead to poor weld quality. Always take the time to ensure that joints are aligned before starting to weld.
- Overlooking the filler rod: Not cleaning the filler rod can lead to contamination in the weld pool. Always clean it using the same methods as the base metal.
Tips for Maintaining Cleanliness During Welding
- Keep your workspace organized and free of debris. A clutter-free environment helps prevent contaminants from coming into contact with your workpieces.
- Use protective covers or tarps to shield your work area from dust and dirt while you are not working.
- Regularly clean your welding equipment, including your TIG torch and any associated tools. This will help maintain the integrity of your welds.
- Establish a routine for cleaning and preparation before each welding session to ensure consistency and quality in your work.
Step 6: Learn to Control Heat Input
Controlling heat input is crucial for successful welding. Too much heat can cause warping, while too little can lead to poor fusion. Mastering heat control not only enhances the quality of your welds but also extends the life of your tungsten electrode and prevents damage to your workpiece.
Understanding the relationship between heat input, travel speed, and material thickness is essential for achieving optimal results. Different materials and thicknesses require varying levels of heat, so being adaptable is key.
Heat Control Techniques
- Practice controlling the pedal to adjust heat as needed. Start by setting your welder to a baseline amperage for the material thickness you are working with. Gradually increase or decrease the pedal pressure while observing the weld pool.
- Pay attention to the color of the metal; a dull red indicates the right heat. For aluminum, a light blue hue can indicate optimal heat, while a bright white may suggest overheating. Keep a color chart handy for reference.
- Move the torch smoothly to distribute heat evenly across the workpiece. Try to maintain a consistent distance from the material, typically around 1/8 inch, to ensure uniform heat distribution.
Practical Steps for Effective Heat Control
- Set Up Your Welder Correctly: Ensure your machine is set to the recommended amperage for the material thickness. Refer to the manufacturer's guidelines for specific settings.
- Establish a Consistent Travel Speed: Practice maintaining a steady speed as you weld. A good rule of thumb is to move at a rate that allows the puddle to form but not so fast that it cools before fusing.
- Use Backstepping Techniques: For thicker materials, backstepping can help control heat input. Weld a short distance, then step back slightly to allow heat to dissipate before continuing.
- Implement Stringer Beads: When welding in positions where overheating is a concern, use stringer beads instead of weaving. This technique reduces heat input by limiting the amount of time the arc is concentrated on one spot.
- Monitor Heat Affected Zone (HAZ): Keep an eye on the HAZ. If you notice discoloration extending too far from the weld, you may be applying too much heat. Adjust your technique accordingly.
Common Mistakes to Avoid
- Overheating the Material: This can lead to burn-through or warping. Always start with lower settings and gradually increase as needed.
- Inconsistent Torch Angle: Holding the torch at varying angles can cause uneven heat distribution. Aim to keep the torch angle consistent, typically around 15 degrees from vertical.
- Neglecting Material Preparation: Dirty or contaminated surfaces can require more heat to achieve proper fusion. Always clean your materials before welding.
- Ignoring Cooling Time: Allow the workpiece to cool naturally instead of quenching it with water, which can lead to cracking and other issues.
By mastering heat input control, you can significantly improve the quality of your TIG welds. Regular practice and awareness of your welding environment will help you become more adept at managing heat, leading to stronger and more aesthetically pleasing welds.
Step 7: Troubleshoot Common Mistakes
Even experienced welders encounter issues. Understanding common mistakes can help you troubleshoot effectively. Here, we will explore common pitfalls in TIG welding, how to identify them, and provide solutions to ensure your welding process remains smooth and efficient.
Common Mistakes to Avoid
- Inconsistent travel speed can lead to uneven welds. It's essential to maintain a steady pace; varying your speed can create weak points in the weld. Aim for a consistent travel speed based on the thickness of the material. A good rule of thumb is to practice on scrap pieces to find the right speed that produces a uniform bead.
- Incorrect tungsten size can affect arc stability. Using a tungsten electrode that is too small for your current setting may lead to overheating and premature wear, while a tungsten that is too large can make it difficult to establish a clean arc. Always select the appropriate tungsten diameter based on the amperage you plan to use. For example, a 1/16" tungsten is suitable for 10-150 amps, while a 3/32" tungsten can handle 150-300 amps.
- Failing to clean the workpiece can result in contamination. Contaminants such as oil, rust, or dirt can lead to poor weld quality and defects. Before starting your weld, clean the base material thoroughly with a degreaser and a wire brush or grinder. For aluminum, consider using a dedicated aluminum cleaner to ensure a clean surface.
Identifying and Fixing Issues
When troubleshooting, it's vital to recognize the signs of each mistake. Here are some tips for diagnosing problems:
1. Uneven Beads
If you notice that your weld beads are uneven, check your travel speed and angle. A common mistake is moving too quickly or at an incorrect angle. Adjust your technique and practice on scrap to develop muscle memory.
2. Crater Cracks
Crater cracks often appear at the end of a weld. This can be due to stopping the arc too abruptly or not adding enough filler material. To prevent this, always taper off the arc gradually, and consider using a filler rod to fill the crater as you finish your weld.
3. Poor Penetration
Poor penetration can occur if your settings are too low or if you are moving the torch too quickly. Increase your amperage gradually while practicing on scrap material to find the right balance that allows for adequate penetration without burning through the base metal.
Checklist for Troubleshooting
Use this checklist to guide your troubleshooting process:
- Check the travel speed: Is it consistent throughout the weld?
- Verify tungsten size: Is it appropriate for the amperage being used?
- Inspect the workpiece: Is it clean and free of contaminants?
- Monitor the gas flow: Is it set correctly to protect the weld pool?
- Evaluate your technique: Are you holding the torch at the correct angle?
Common Mistakes Recap
Understanding these common mistakes and their solutions will significantly enhance your TIG welding skills. Remember, practice is key. Regularly working on these areas will help you become a more proficient welder. Keep refining your technique, and don't hesitate to seek feedback from more experienced welders. Over time, you will develop the expertise needed to troubleshoot effectively and produce high-quality welds consistently.
Conclusion
Now that you have a structured approach to mastering TIG welding techniques, it's time to put your skills into practice. Focus on one step at a time and incorporate the tips provided. Remember, consistent practice and attention to detail will significantly improve your welding capabilities. Start by setting up your equipment and practicing the basic techniques today.
Action Steps for Mastery
To effectively master TIG welding, follow these actionable steps:
- Set Up Your Workspace: Ensure your workspace is clean, organized, and well-ventilated. Position your welder, filler rods, and other tools within easy reach. Check that your gas supply is secure and that you have the right tungsten electrode for your project.
- Practice Basic Techniques: Begin with the fundamentals. Focus on techniques such as stringer beads, weave patterns, and controlling the heat input. Use scrap metal to practice without the pressure of a final product.
- Experiment with Different Materials: Try welding various metals like aluminum, stainless steel, and mild steel. Each material has unique properties that will challenge and refine your skills.
- Seek Feedback: If possible, work alongside experienced welders or instructors. Ask for constructive criticism on your technique and take notes on areas for improvement.
- Document Your Progress: Keep a welding journal to track your practice sessions, noting what techniques you worked on, what went well, and what needs improvement. This reflection will help you recognize patterns in your learning.
Common Mistakes to Avoid
As you embark on your TIG welding journey, be aware of these common pitfalls:
- Inconsistent Torch Angle: Maintaining a consistent torch angle is crucial for achieving even welds. Practice keeping your torch at a steady 15 to 20-degree angle relative to the workpiece.
- Improper Heat Settings: Using too much heat can warp materials, while too little can lead to weak welds. Take the time to adjust your settings based on the thickness and type of metal you are welding.
- Neglecting Filler Rod Technique: Ensure you are feeding the filler rod at the right speed and angle. Practice adding filler rod without interrupting the arc to maintain a smooth weld pool.
- Ignoring Safety Precautions: Always wear appropriate personal protective equipment (PPE), including a welding helmet with the correct shade, gloves, and protective clothing. Safety should never be compromised.
Setting Goals for Improvement
To track your development effectively, consider setting specific, measurable goals:
- Short-Term Goals: Aim to master one technique per week, such as stringer beads or corner joints. Assess your progress at the end of each week.
- Long-Term Goals: Plan to complete a specific project that incorporates multiple techniques, such as fabricating a metal table or a decorative piece. This will challenge you to apply what you've learned.
Final Thoughts
Mastering TIG welding techniques takes time and dedication. By following a structured approach, avoiding common mistakes, and setting clear goals, you can significantly enhance your skills. Remember, every experienced welder started where you are now. Keep practicing, stay patient, and enjoy the process of becoming a skilled TIG welder.
In short
This post focuses on how to master TIG Welder techniques with a practical approach you can apply right away. Built for Enthusiasts / learners / participants (not sellers). You?ll see clear steps, common mistakes, and a simple execution path.
Quick answer
The fastest way to get results with how to master TIG Welder techniques is to follow a simple sequence: start with the basics, apply one proven method, measure a small set of signals, then improve one thing at a time. Avoid changing multiple variables at once so you know what worked. Audience-first only. Write like a trusted niche blog: helpful, clear, structured, and genuinely informative. Focus on fundamentals, improvement, terminology, culture, people, gear, and common scenarios in the niche. Do NOT write seller/operator content (no "Shopify apps", no "optimize your store", no "collections setup", no "increase conversion rate", no SEO/ads talk). Avoid aggressive CTAs and "buy now" language. If products are mentioned, keep it subtle and contextual (examples, use-cases, what to look for), never pushy.
Context and related concepts
Fundamentals ? Beginner basics ? Terminology ? Glossary ? Skills ? Techniques ? Best practices ? Common mistakes ? Gear / tools / materials ? Options ? Use-cases ? Tradeoffs ? Culture ? Lifestyle ? Community norms ? History ? People / creators / athletes ? Events ? Trends ? Care / maintenance ? Safety ? Sizing / fit (if relevant)
FabCore X Supply: FabCore X Supply is an online distributor of industrial metalworking and fabrication equipment. We sell equipment used in welding, cutting, forming, and machining including TIG welders, MIG welders, plasma cutters, bandsaws, cold saws, drill presses, lathes, belt grinders, ironworkers, tube benders, metal shears, press brakes, shop presses, arbor presses, notchers, track torches, welding tables, welding carts, welding helmets, PAPR welding respirators, rod ovens, and metal fabrication accessories. We are an authorized retailer for manufacturers including Arc Star, Blue Demon, Blue Star, HTP America, Laguna Tools, Metal Man, Metalpro, Optrel, Sumner, TIG Star, and WeldPro.